
%201.svg)

Platforms and Languages Leveraged:
- Windows 10: Virtual Machines (Microsoft Azure)
- Microsoft Defender
- Microsoft Sentinel
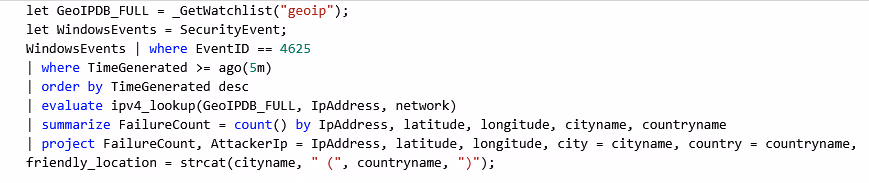
- Kusto Query Language (KQL)
Project Overview
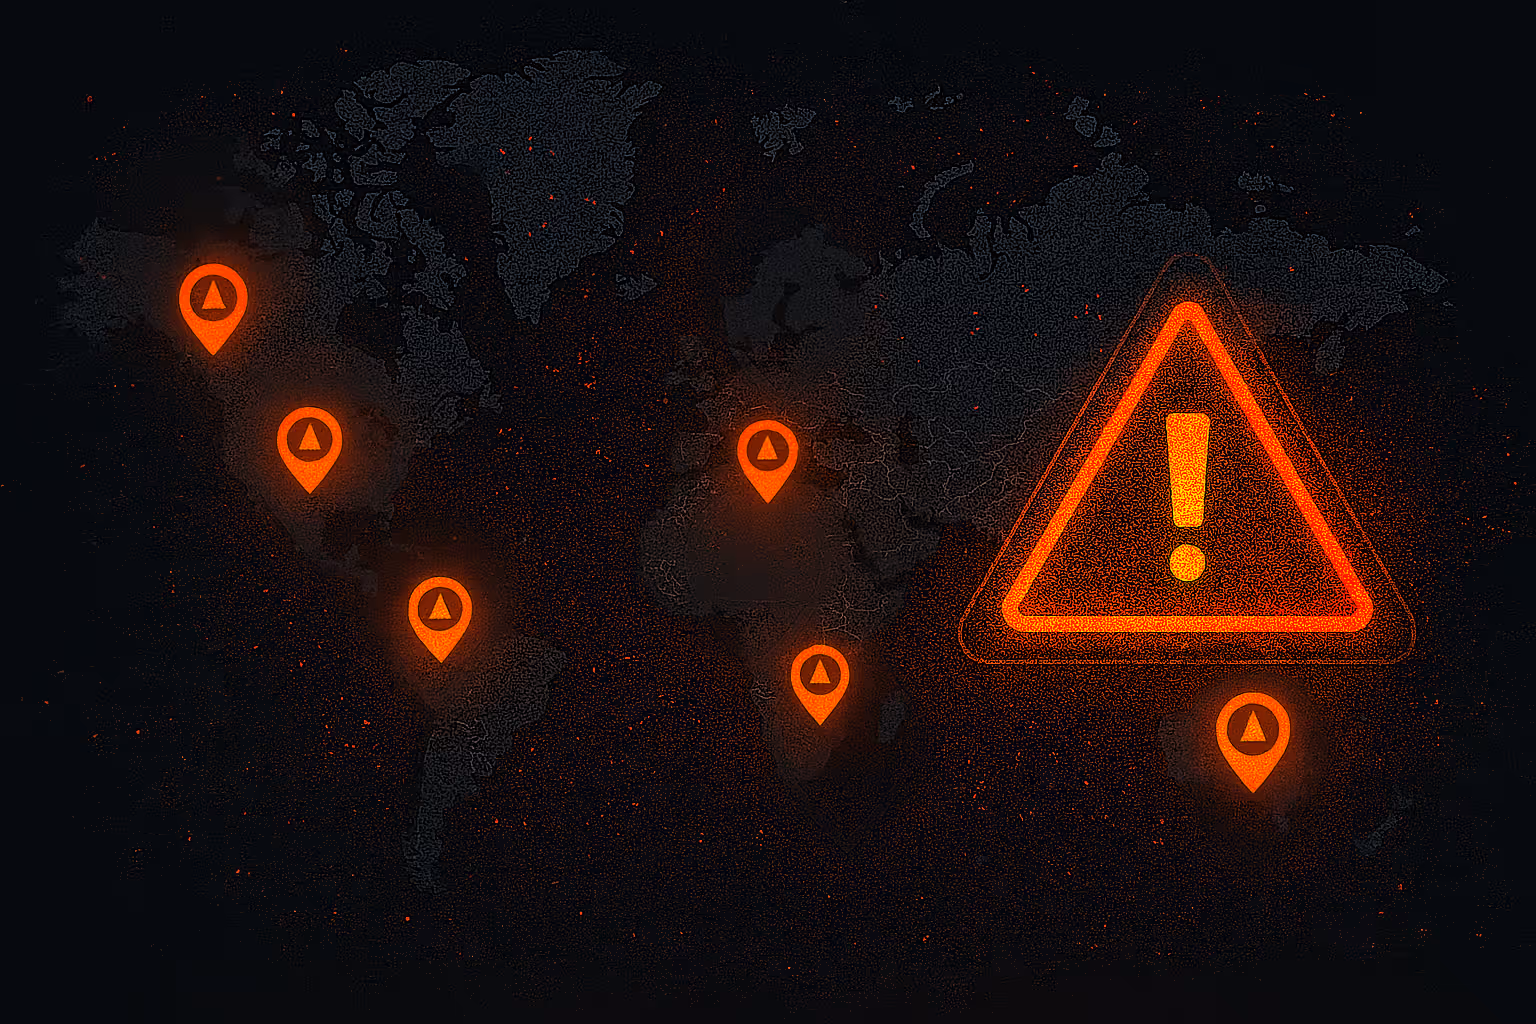
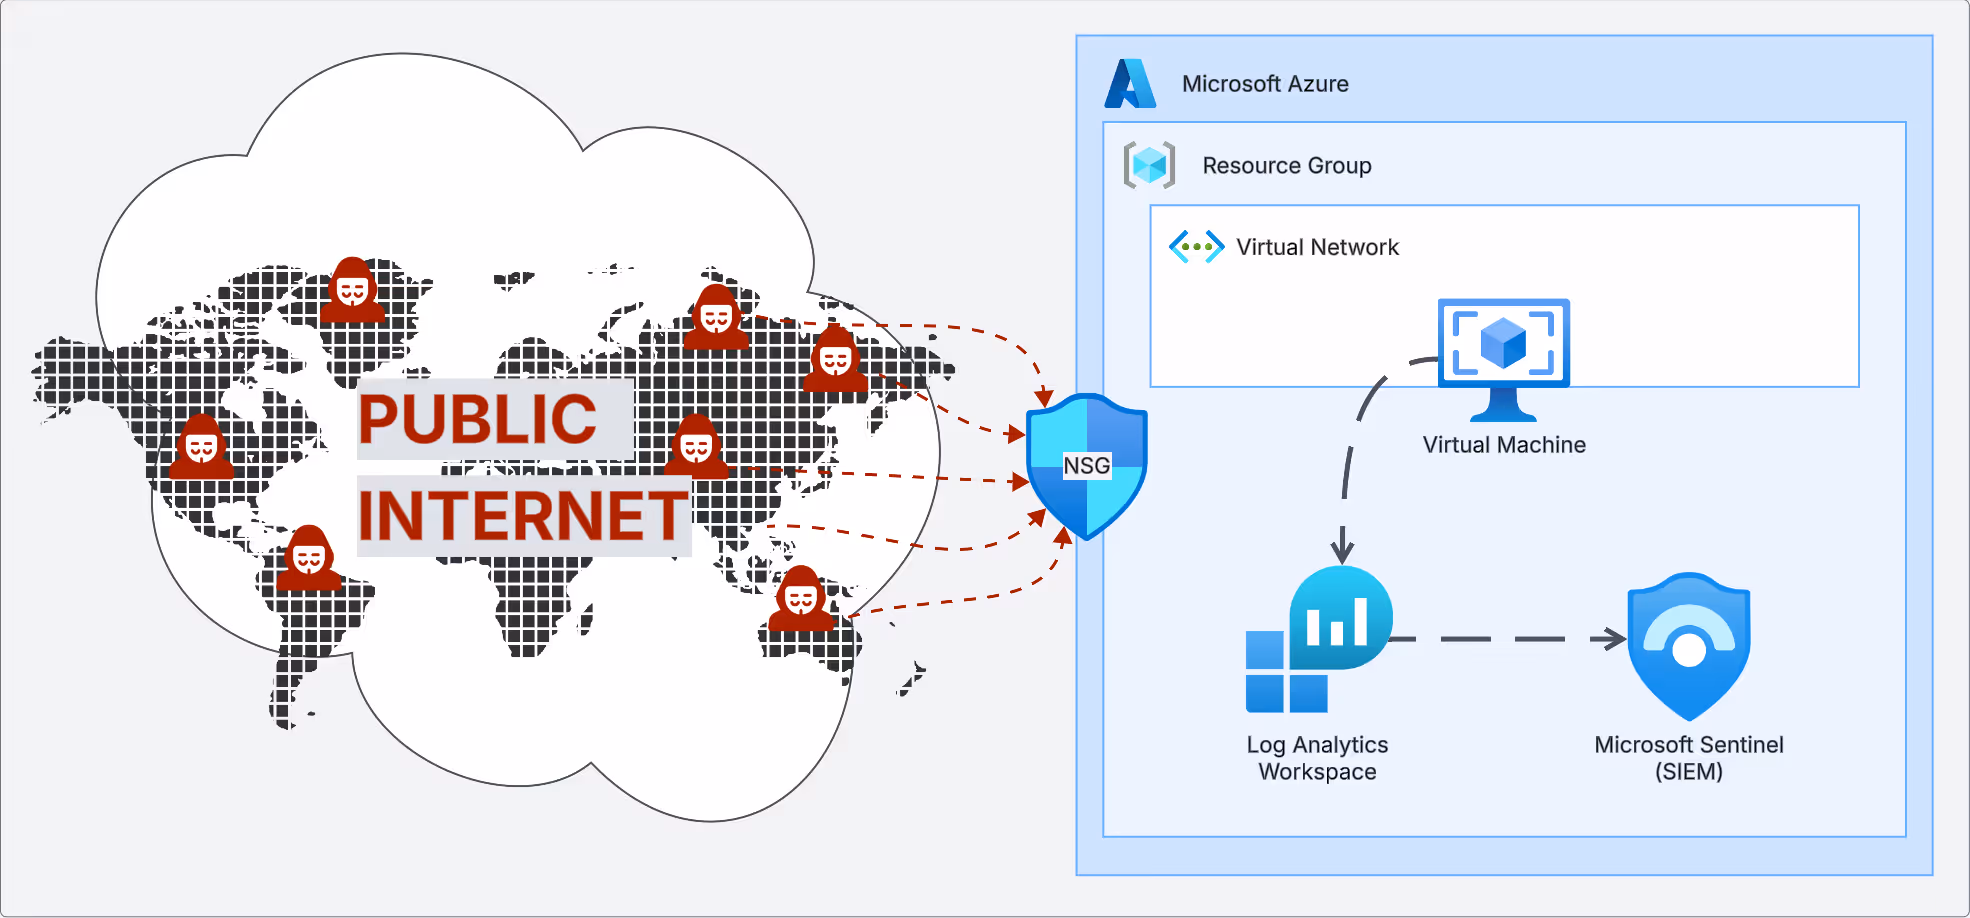
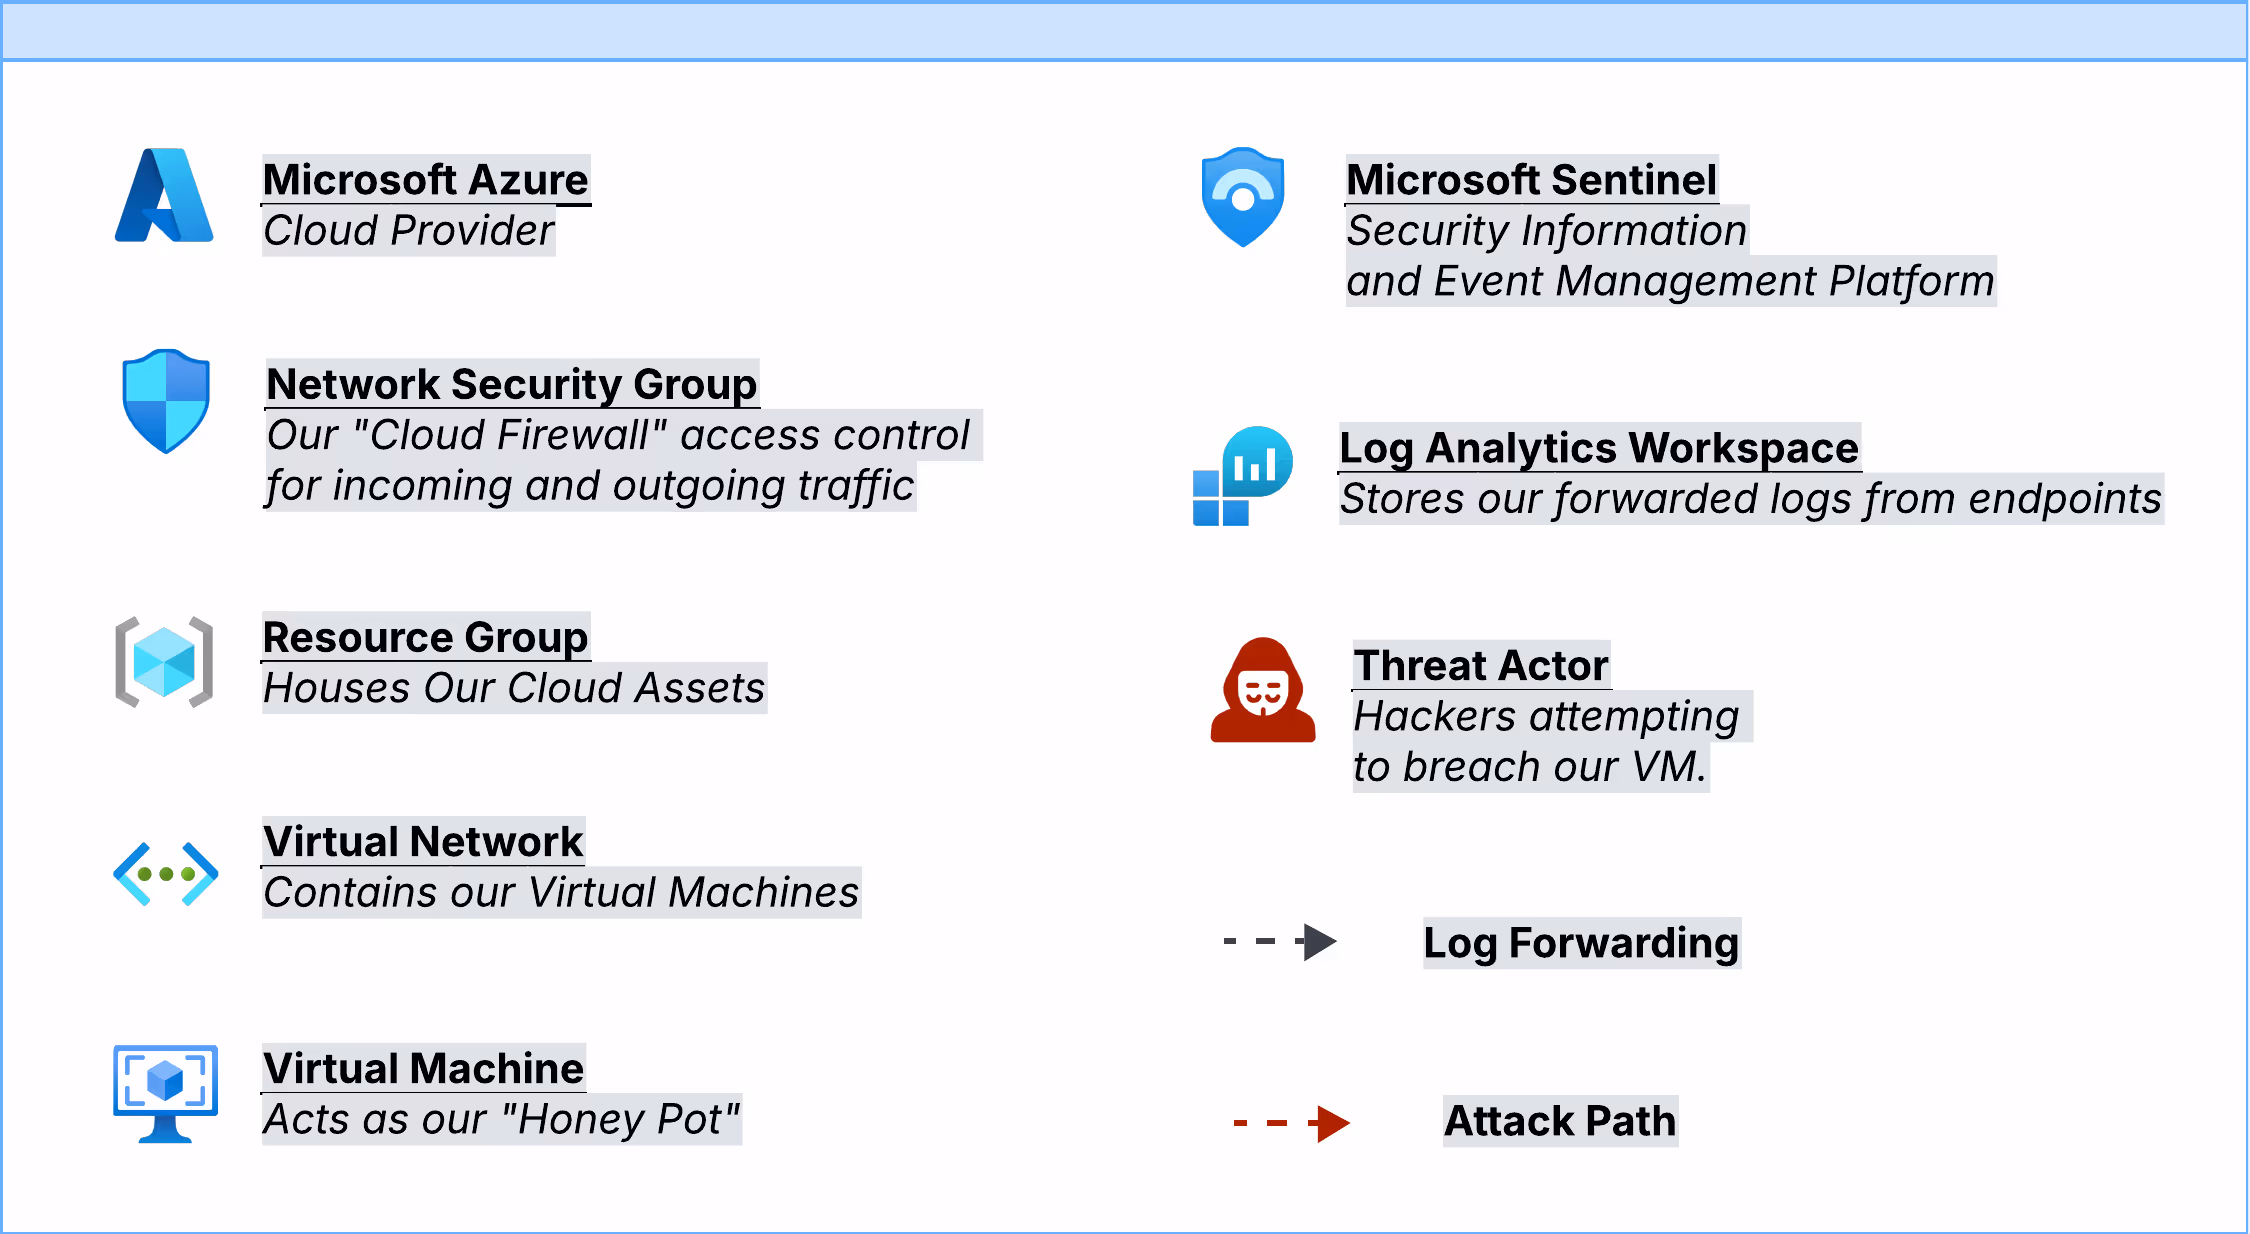
For this project, I set up a Honeypot in Microsoft Azure. At the center of the environment is a Windows 11 virtual machine configured as a honeypot, intentionally exposed to the public internet, so I could observe and analyze real-world attack attempts. Using Microsoft Sentinel, Log Analytics Workspace, and Kusto Query Language (KQL), I tracked activity, detected threats, and dug into incidents as they unfolded.
Configuring The Environment
1) Login to Microsoft Azure
2) Create a Resource Group. This holds all of our cloud assets.
3) Within the resource group, we need to create a new Virtual Network. This Vnet sets up our allocated IP addresses for all virtual machines we wish to create.
4) After configuring our virtual network, We can create our Virtual Machine which will act as our honeypot.
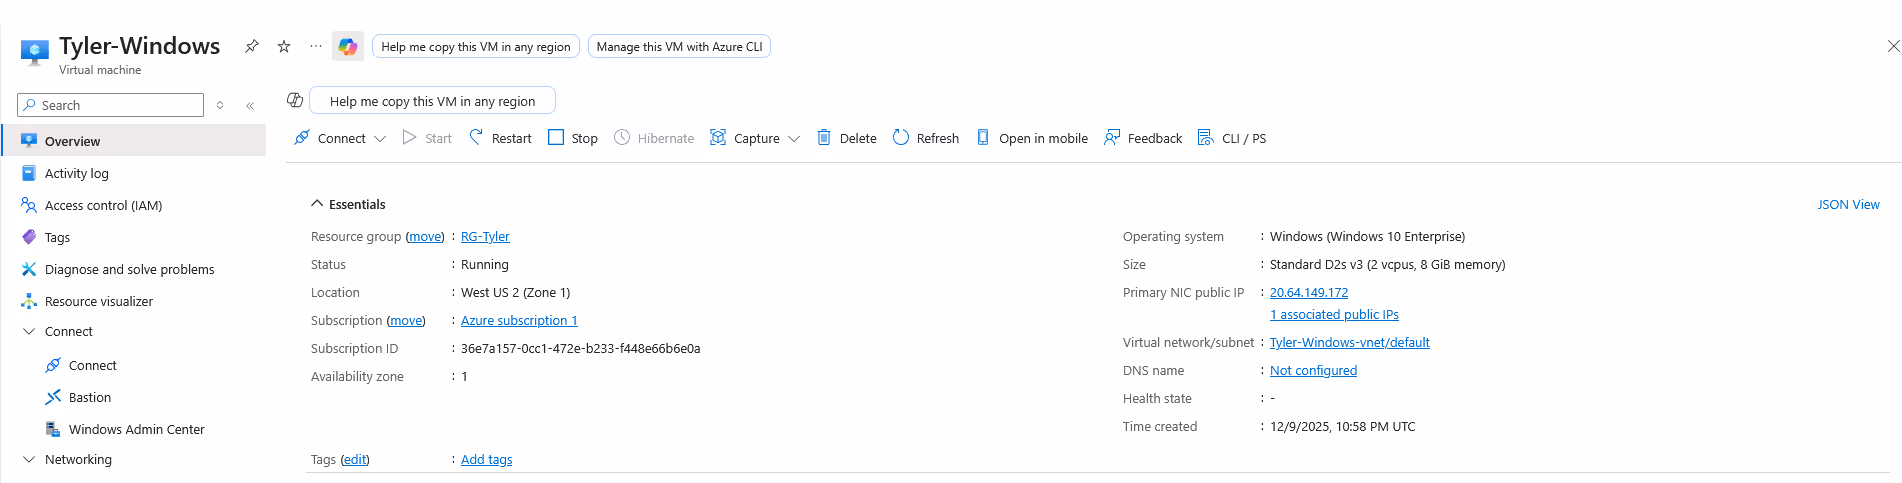
5) Now that our VM is created, we need to expose it to the internet. By default, there are security measures in place to block incoming connection requests, which we will turn off.
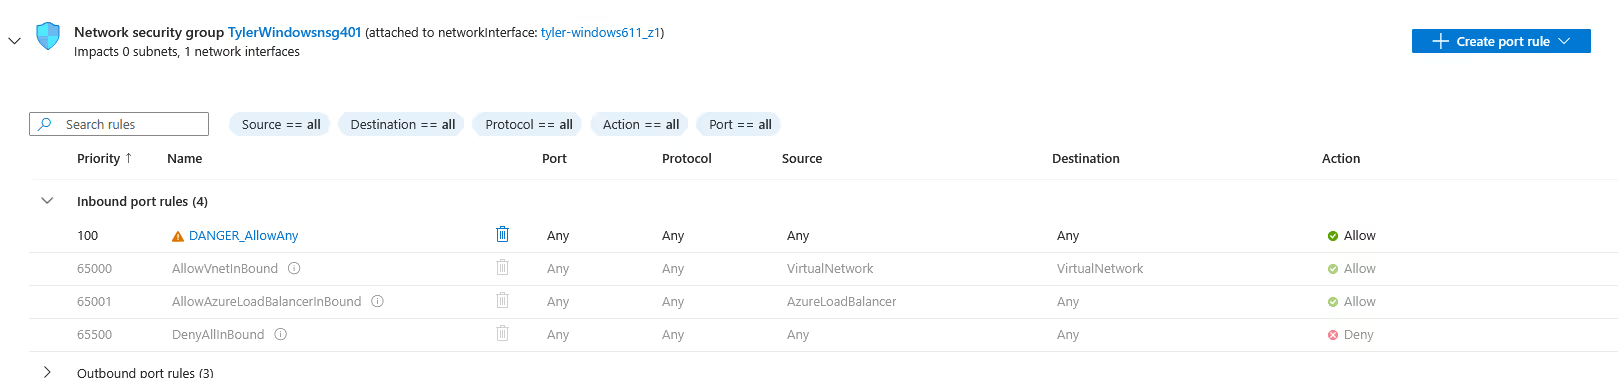
6) First, we need to reconfigure our Network Security Group rules. By default, our NSG acts as a "cloud firewall" blocking inbound connections except RDP, SSH, or any other connection methods we chose when creating the VM. By creating a new Inbound traffic rule, we can allow any and all ports to be open to the internet. In the real world, this is VERY dangerous and should not be done.
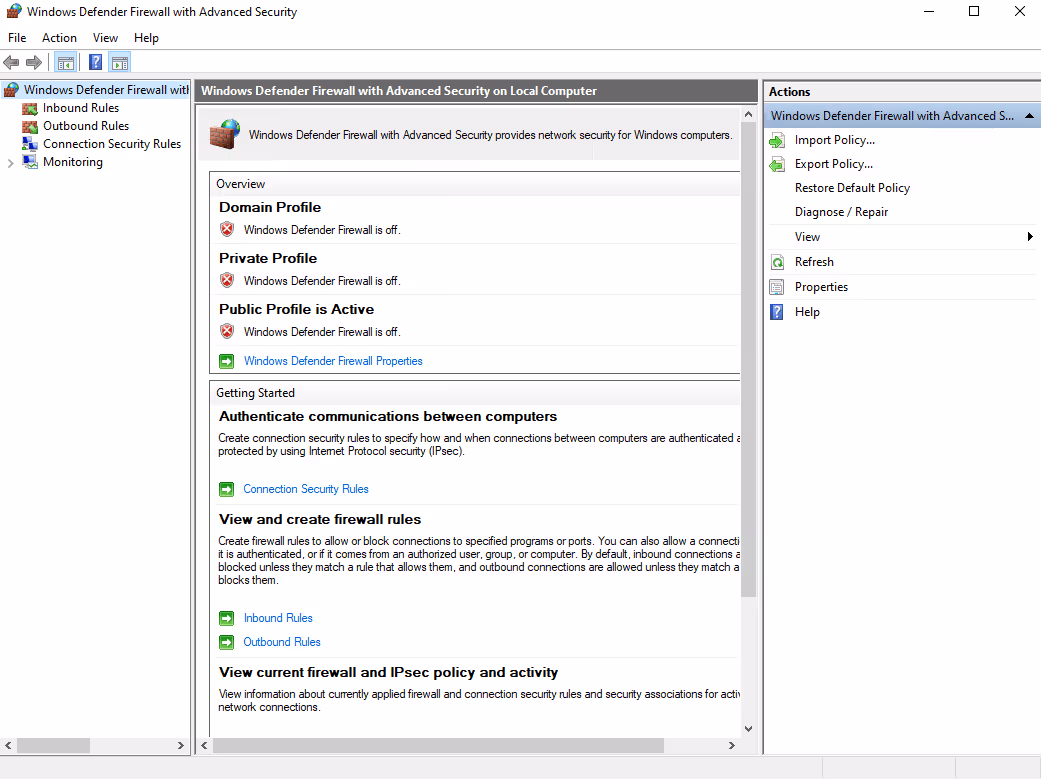
7) Now that our NSG is open to the public internet, we need to log on to our VM, and disable the firewall to allow incoming connection requests.
8) With both our NSG and Firewall disabled, we now need to ping our machine to see if we get a response. To do so, we will open a cmd prompt on our personal device and type "ping <xxx.xxx.xxx.xxx>" where xxx represents our VM's public IP address.
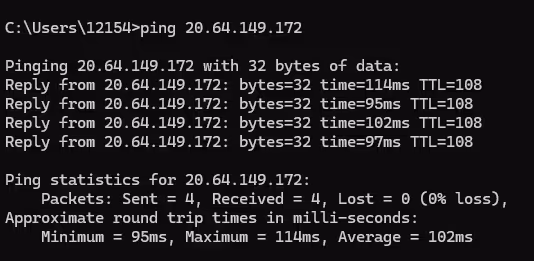
9) Now that we have gotten a successful response from our ping request, we can confirm our VM is now open and responding to the public internet.
Logging and Monitoring
To successfully log and monitor our VM, we need to set up Log Analytics Workspace (LAW). LAW is a centralized location where we can query and review any incoming logs. With our workspace setup, we need to install the Azure Monitoring Agent on our VM to collect and forward the logs to LAW. To test if our logs are forwarding, we can run a simple query by typing in a table name to see if we receive any results. (It may take a few minutes for the logs to begin forwarding).
Querying logs is helpful, but to take our analysis a step further, we will need to set up and forward our logs to Microsoft Sentinel. Within Sentinel, we have more capabilities to analyze our data; for example, we will soon create visual representations of our data, as well as create a watchlist, which will help us correlate the attackers IP addresses with their geographical location.
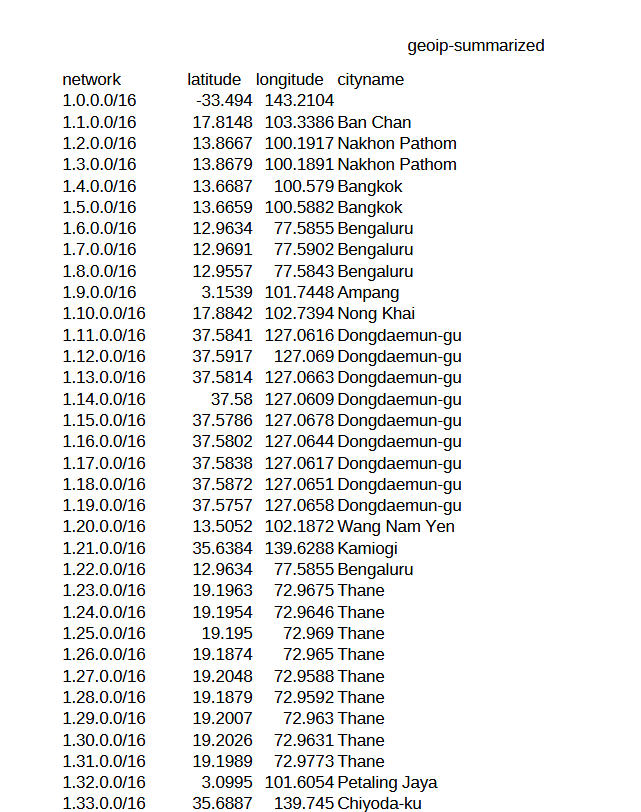
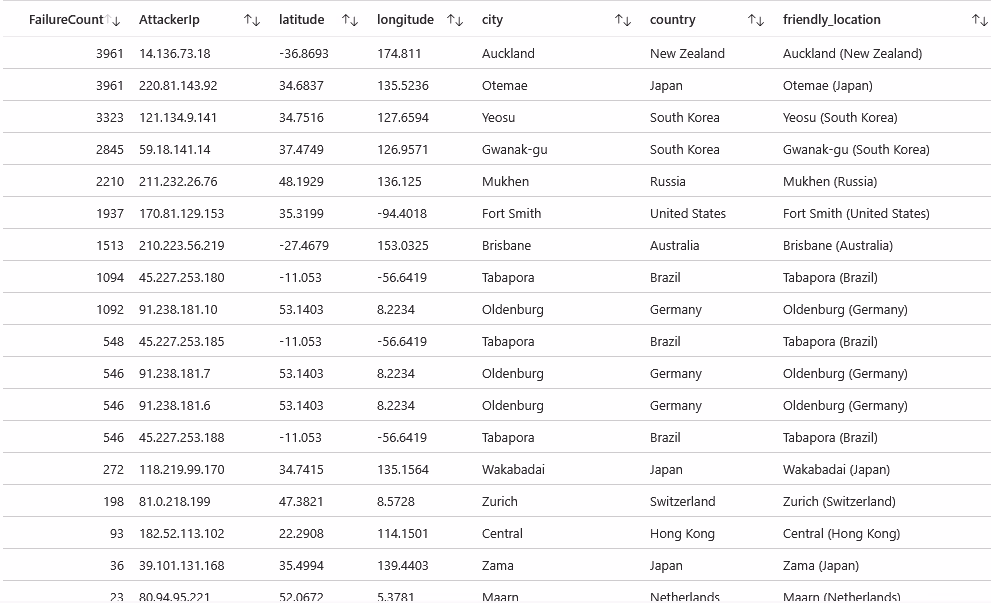
Within Azure, I uploaded a csv file that correlates the incoming attackers' IP addresses with their geographical location, including latitude/longitude coordinates, city, and country. This will be helpful when plotting our attack map. The csv shown below is a sample of the data; however, it includes a list of all networks ranging from 1.0.0.0 - 255.255.255.255.
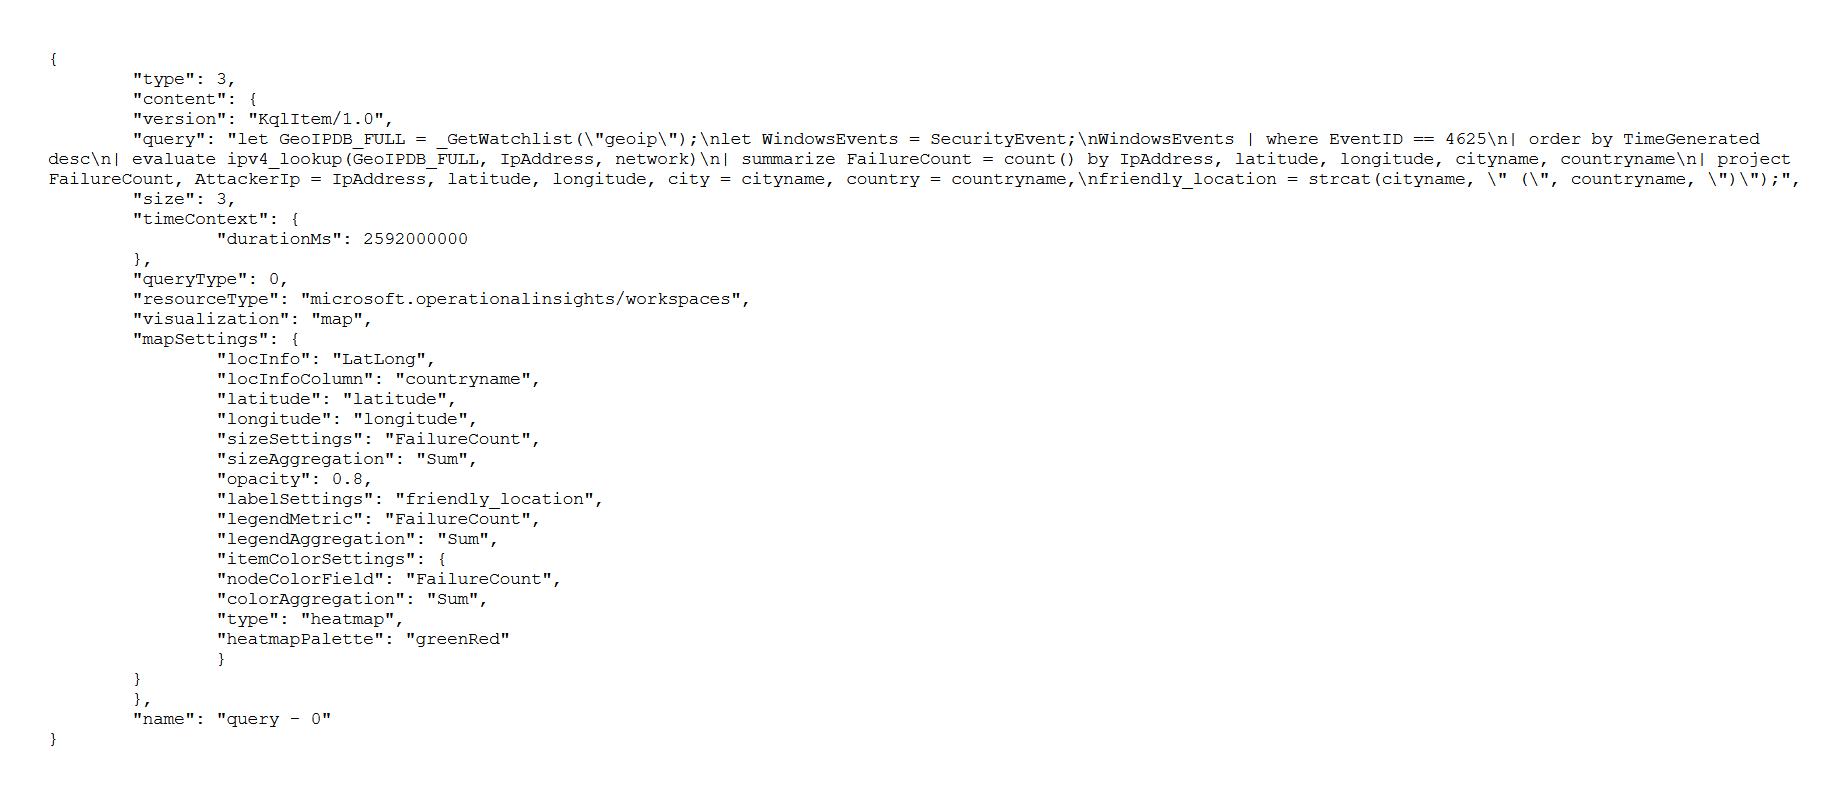
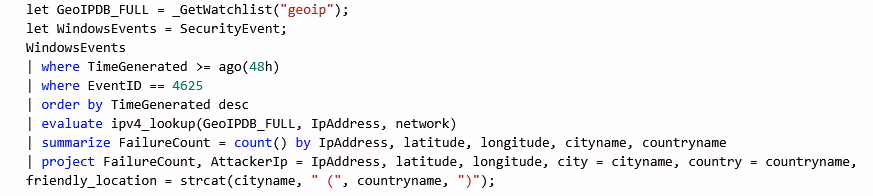
With our watchlist setup, we can now create a workbook within Azure. A workbook is used to create a visual dashboard for our data. By editing the default JSON, we can create a custom map with metrics and labels we want to plot. The following JSON was used to create a map that shows the Latitude, Longitude, City, Country, and IP addresses of the failed logins from around the world.
Query Results
Now that our environment is set up, we can query the workbook to show our results.
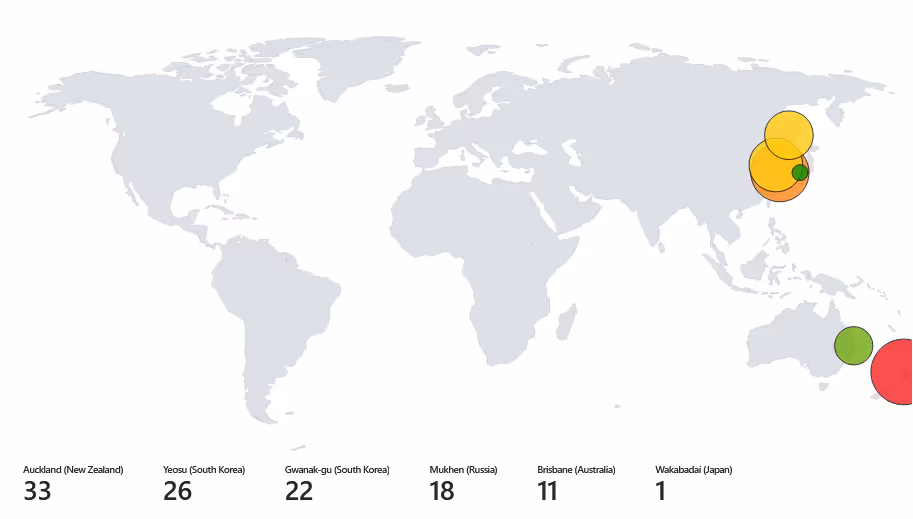
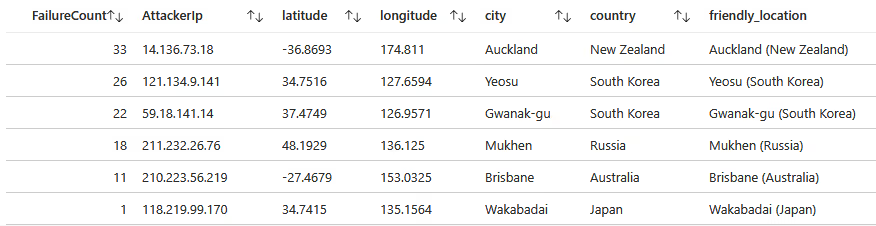
Failed Login Attempts (5 min):
Within 5 minutes, a total of 111 failed login attempts occurred! We can see an attacker with an IP of 14.136.73.18 from Auckland, New Zealand, was the most persistent, with 33 login attempts.
Failed Login Attempts (24 hr):
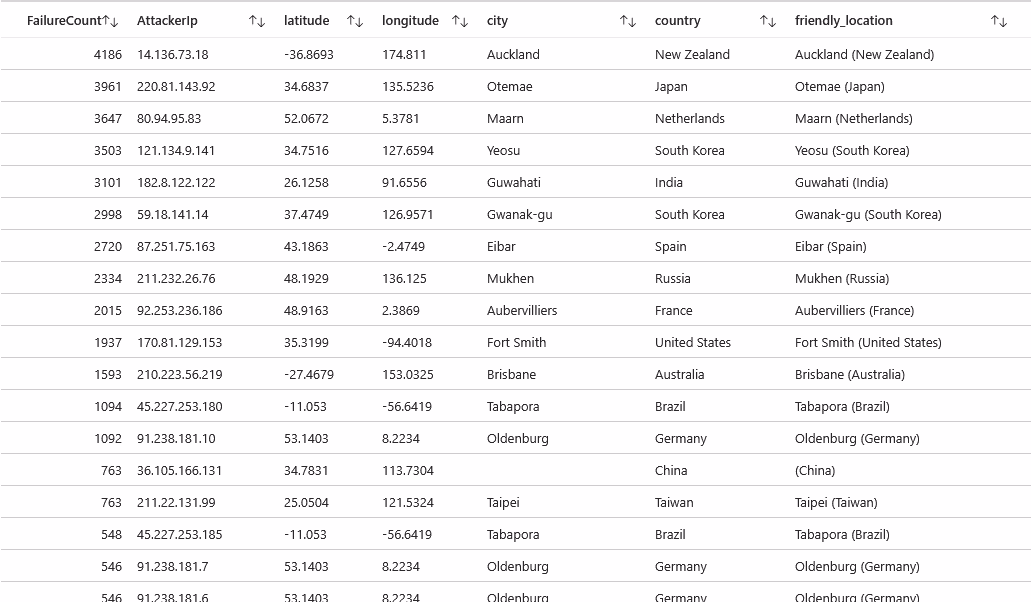
Within 24 hours, a total of 24,799 failed login attempts occurred! We can see the same attacker with an IP of 14.136.73.18 from Auckland, New Zealand, was the most persistent, along with IP 220.81.143.92 from Otemae, Japan with 3,961 failed attempts.

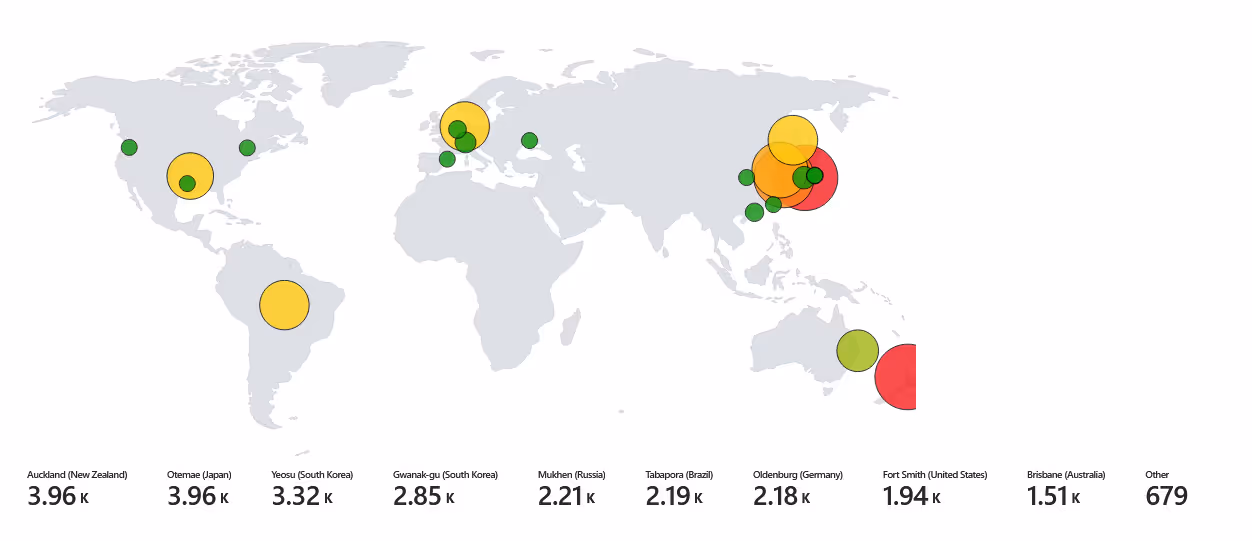
Failed Login Attempts (48 hr):
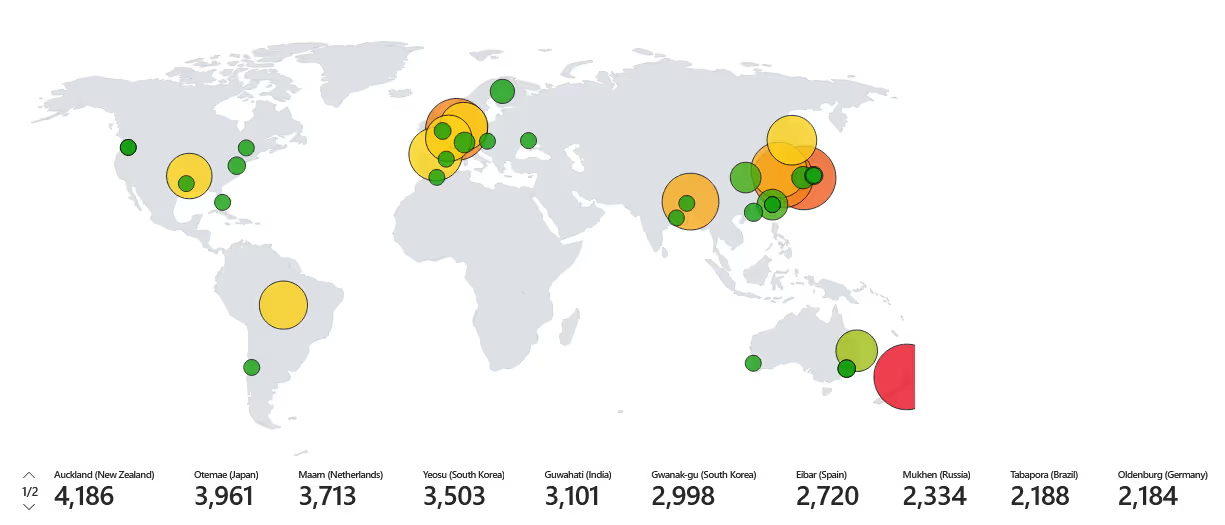
Within 48 hours, there were more than 50,000 failed login attempts! We can see the same two attackers continue to have the most brute force attempts. however, when we look at the visual, we can see that the login attempts are spread out throughout the world. Previously, most of the attempts were coming from Asian countries and New Zealand, whereas now we are beginning to see more activity stemming from European countries, specifically Germany.
Conclusion
This project highlights the serious risks that come with misconfigurations and the absence of a proper firewall. Even though the work was carried out in a controlled environment with no sensitive data at stake, it clearly demonstrates how quickly things can spiral when security posture is weak. Using simple techniques like brute force or dictionary attacks, common passwords can be cracked in a matter of minutes, days, or weeks, depending on their complexity. What makes this issue even more concerning is that many users underestimate the threat or assume they won’t be targeted, leaving themselves exposed to attacks that are both real and frequent. Weak credentials, poor configurations, and a lack of layered defenses create an open door for attackers, and this project serves as a reminder of just how critical it is to enforce strong security practices, even in environments that may seem low-risk.

